


註冊傳送方資訊
解決方法
您接收的傳真可能附有資訊,例如傳送方的名稱或公司名稱、傳送方的電話或傳真號碼及傳輸的日期及時間,該資訊將以小字體列印在每頁的頂端。這些傳送方資訊被稱為傳輸終端認證或 TTI。
您可以在本機中註冊 TTI,因此傳真的接收方將知道是誰、在何時傳送的傳真。
以下示例說明了在本機傳送的傳真上列印傳送方資訊的方法︰
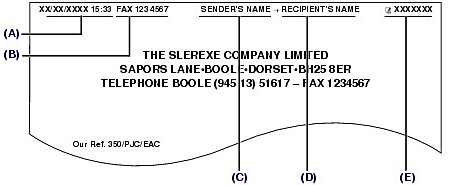
(A)傳輸的日期及時間
(B)傳送方的傳真/電話號碼
(C)傳送方的名稱
(D)從編碼快速撥號傳送時,顯示接收方的名稱。
(E)頁碼
NOTE
關於傳送方資訊
- 下列清單列出除描述以外的傳送方資訊。
- 傳送黑白傳真時,您可以設定在影像區域內或影像區域外列印傳送方資訊。
- 對於傳送彩色傳真,傳送方資訊列印在列印區域內並且不列印接收方名稱。
- 您可以選擇在號碼前顯示傳真或電話。
- 三個日期顯示格式可用。
- 您可列印「使用者資料」清單以確認您註冊的傳送方資訊。
以下字元指定為數字按鈕。
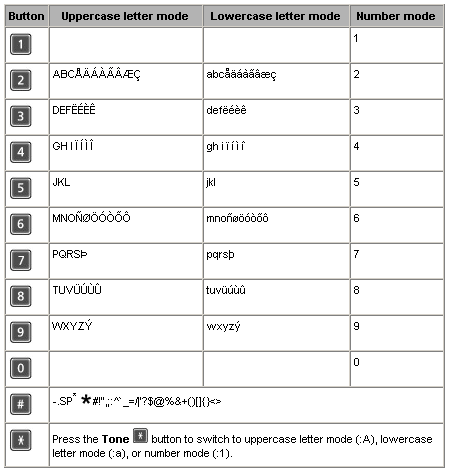
* SP 表示空格。
註冊用於傳送方資訊的名稱及傳真/電話號碼或快速撥號時,請按照以下步驟輸入字母及數字。
1. 切換輸入模式。
(1) 按[音頻] 按鈕轉換到大寫字母模式(:A)、小寫字母模式(:a)或數字模式(:1)。
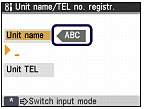
按鈕轉換到大寫字母模式(:A)、小寫字母模式(:a)或數字模式(:1)。根據個體名稱、名稱或組名稱右側顯示的字元,可知當前處在哪種模式下。
示例:大寫字母模式
NOTE
此處介紹個體名稱/電話號碼註冊。要顯示「個體名稱/電話號碼註冊(Unit name/TEL no. registr.)」
2. 使用數字按鈕輸入字元。
重複按按鈕直至出現您要輸入的字元。
- 要輸入與之前條目指定相同按鈕的字元(例如,要在「C」後輸入「A」)︰
按下 (右) 按鈕,並按相同的數字按鈕。
(右) 按鈕,並按相同的數字按鈕。(1) 按  按鈕三次。
按鈕三次。
按鈕三次。
(2) 按 (右) 按鈕,並再次按 按鈕。
(右) 按鈕,並再次按 按鈕。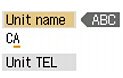
要輸入空格︰按下 (右) 按鈕兩次。在數字模式下,按 (右) 按鈕一次。
(右) 按鈕兩次。在數字模式下,按 (右) 按鈕一次。要刪除字元︰按下 (左) 按鈕。
(左) 按鈕。要刪除一條完整條目︰按住 (左) 按鈕。
(左) 按鈕。NOTE
- 三個日期顯示格式可用︰年/月/日、月/日/年及日/月/年。
- 本機連接至已安裝 印表機驅動程式的電腦時,日期及時間設定將從電腦複製至本機。如果已在電腦上準確設定了日期及時間,則您無須在本機設定。
- 如果您拔掉電源插頭或停電,本機的資料及時間設定將被重置。當您將本機連接至裝有印表機驅動程式的電腦時,設定將再次被複製到本機上。
1. 顯示「日期/時間設定(Date/time setting)」螢幕。
(1)按[傳真]按鈕,並按[功能表]按鈕。
(2) 使用  (左) 或
(左) 或 (右) 按鈕選擇「設定(Settings)」
 ,並按 [ OK ] 按鈕。
(左) 或 (右) 按鈕選擇「設定(Settings)」 ,並按 [ OK ] 按鈕。(3) 使用 (左) 或 (右) 按鈕選擇「設備設定(Device Settings)」 ,並按 [ OK ] 按鈕。
(左) 或 (右) 按鈕選擇「設備設定(Device Settings)」,並按 [ OK ] 按鈕。(4) 使用  (上) 或
(上) 或 (下) 按鈕選擇「傳真設定(FAX settings)」,並按「OK」按鈕。
(上) 或 (下) 按鈕選擇「傳真設定(FAX settings)」,並按「OK」按鈕。(5) 使用 (上) 或 (下) 按鈕選擇「使用者設定(User settings)」,並按「OK」按鈕。
(上) 或 (下) 按鈕選擇「使用者設定(User settings)」,並按「OK」按鈕。(6) 使用 (上) 或 (下) 按鈕選擇「日期/時間設定(Date/time setting)」,並按「OK」按鈕。
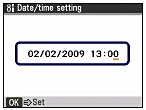
(上) 或 (下) 按鈕選擇「日期/時間設定(Date/time setting)」,並按「OK」按鈕。2. 輸入日期及時間。
(1) 使用數字按鈕輸入日期及時間(以 24 小時格式)。
只輸入年份的最後兩位。
NOTE
- 您亦可使用 (上) 或 (下)按鈕更改數字。
- 如果誤輸入日期及時間,按 (左) 或 (右) 按鈕將箭頭移動至該數字下方並輸入正確的數字。
(2) 按一下 [ OK] 按鈕。
3. 返回傳真待命螢幕。
(1) 按下[傳真]按鈕。
部份國家/地區應用日光節約時間(夏令時)系統,即在每年特定的時期向前調整時間。
透過註冊日光節約時間(夏令時)開始及結束的日期及時間,您可以設定本機自動更改時間。
IMPORTANT
並非所有國家或地區的最新資訊都被預設為應用夏令時。因您所在國家或地區的最新資訊而異,您需要更改預設設定。
NOTE
因購買的國家或地區而異,此設定可能不能使用。
1. 顯示「夏令時設定(Summer time setting)」螢幕。
(1)按[傳真]按鈕,並按[功能表]按鈕。
(2) 使用 (左) 或 (右) 按鈕選擇「設定(Settings)」,並按 [ OK ] 按鈕。
(左) 或 (右) 按鈕選擇「設定(Settings)」,並按 [ OK ] 按鈕。(3) 使用 (左) 或 (右) 按鈕選擇「設備設定(Device Settings)」,並按 [ OK ] 按鈕。
(左) 或 (右) 按鈕選擇「設備設定(Device Settings)」,並按 [ OK ] 按鈕。(4) 使用 (上) 或 (下) 按鈕選擇「傳真設定(FAX settings)」,並按「OK」按鈕。
(上) 或 (下) 按鈕選擇「傳真設定(FAX settings)」,並按「OK」按鈕。(5) 使用 (上) 或 (下) 按鈕選擇「使用者設定(User settings)」,並按「OK」按鈕。
(上) 或 (下) 按鈕選擇「使用者設定(User settings)」,並按「OK」按鈕。(6) 使用 (上) 或 (下) 按鈕選擇「夏令時設定(Summer time setting)」,並按「OK」按鈕。
(上) 或 (下) 按鈕選擇「夏令時設定(Summer time setting)」,並按「OK」按鈕。2. 啟用夏令時。
(1) 使用 (上) 或 (下) 按鈕選擇「開(ON)」啟用夏令時。
(上) 或 (下) 按鈕選擇「開(ON)」啟用夏令時。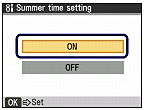
要停用夏令時,選擇「關(OFF)」。
(2) 按一下 [ OK] 按鈕。
3. 設定夏令時開始的日期及時間。
(1) 使用 (上) 或 (下)按鈕選擇「開始日期/時間(Start date/time)」,並按「OK」按鈕。
(上) 或 (下)按鈕選擇「開始日期/時間(Start date/time)」,並按「OK」按鈕。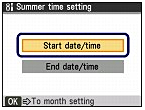
(2) 使用 (上) 或 (下) 按鈕選擇夏令時開始的月份,並按「OK」按鈕。
(上) 或 (下) 按鈕選擇夏令時開始的月份,並按「OK」按鈕。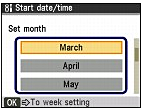
(3) 使用 (上) 或 (下) 按鈕選擇夏令時開始的周,並按「OK」按鈕。
(上) 或 (下) 按鈕選擇夏令時開始的周,並按「OK」按鈕。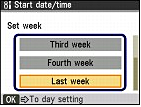
(4) 使用 (上) 或 (下) 按鈕選擇夏令時開始周中的開始當天,並按「OK」按鈕。
(上) 或 (下) 按鈕選擇夏令時開始周中的開始當天,並按「OK」按鈕。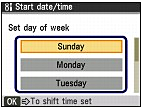
(5) 使用數字按鈕輸入夏令時開始的時間(以 24 小時格式)。在個位數前補零。

(6) 按一下 [OK] 按鈕。
夏令時開始日期/時間已設定。
4. 設定夏令時結束的日期及時間。
(1) 使用 (上) 或 (下)按鈕選擇「結束日期/時間(End date/time)」,並按「OK」按鈕。
(上) 或 (下)按鈕選擇「結束日期/時間(End date/time)」,並按「OK」按鈕。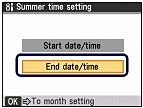
(2) 使用 (上) 或 (下) 按鈕選擇夏令時結束的月份,並按「OK」按鈕。
(上) 或 (下) 按鈕選擇夏令時結束的月份,並按「OK」按鈕。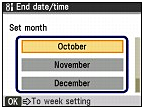
(3) 使用 (上) 或 (下) 按鈕選擇夏令時結束的周,並按「OK」按鈕。
(上) 或 (下) 按鈕選擇夏令時結束的周,並按「OK」按鈕。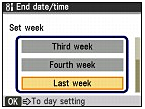
(4) 使用 (上) 或 (下) 按鈕選擇夏令時結束周中的當天,並按「OK」按鈕。
(上) 或 (下) 按鈕選擇夏令時結束周中的當天,並按「OK」按鈕。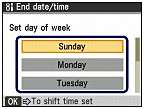
(5) 使用數字按鈕輸入夏令時結束的時間(以 24 小時格式)。
在個位數前補零。
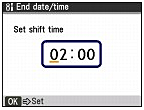
(6) 按一下 [ OK] 按鈕。
夏令時結束日期/時間已設定。
5. 返回傳真待命螢幕。
(1) 按下[傳真]按鈕。
IMPORTANT
傳送傳真前,請在「個體名稱/電話註冊(Unit name/TEL registr.)」螢幕的「個體電話(Unit TEL)」中輸入傳真/電話號碼。(只適用於美國)
1. 顯示「個體名稱/電話號碼註冊(Unit name/TEL no. registr.)」螢幕。
(1)按[傳真]按鈕,並按[功能表]按鈕。
(2) 使用 (左) 或 (右) 按鈕選擇「設定(Settings)」,並按 [ OK ] 按鈕。
(左) 或 (右) 按鈕選擇「設定(Settings)」,並按 [ OK ] 按鈕。(3) 使用 (左) 或 (右) 按鈕選擇「設備設定(Device Settings)」,並按 [ OK ] 按鈕。
(左) 或 (右) 按鈕選擇「設備設定(Device Settings)」,並按 [ OK ] 按鈕。(4) 使用 (上) 或 (下) 按鈕選擇「傳真設定(FAX settings)」,並按「OK」按鈕。
(上) 或 (下) 按鈕選擇「傳真設定(FAX settings)」,並按「OK」按鈕。(5) 使用 (上) 或 (下) 按鈕選擇「使用者設定(User settings)」,並按「OK」按鈕。
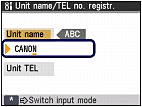
(上) 或 (下) 按鈕選擇「使用者設定(User settings)」,並按「OK」按鈕。(6) 使用 (上) 或 (下) 按鈕選擇「個體名稱/電話號碼註冊(Unit name/TEL no. registr.)」,並按「OK」按鈕。
(上) 或 (下) 按鈕選擇「個體名稱/電話號碼註冊(Unit name/TEL no. registr.)」,並按「OK」按鈕。2. 輸入名稱。
(1) 使用數字按鈕輸入名稱(包含空格最多 24 個字元)。
(2) 按一下 [ OK ] 或 (下)按鈕。
(下)按鈕。3. 輸入傳真/電話號碼。
(1)使用數字按鈕輸入傳真/電話號碼(包含空格最多 20 位數字)。
要在數字前輸入加號(+),按 按鈕。
按鈕。
按鈕。
(2) 按一下 [ OK] 按鈕。
4. 返回傳真待命螢幕。
(1) 按下[傳真]按鈕。