Setting the ISO speed (PowerShot G3 X)
Solution
Raise the [ISO speed] to use a fast shutter speed when you wish to reduce the effects of camera shake or avoid blurry subjects, or to turn the flash off when shooting in a dark area.
Also, with [ISO AUTO] selected, you can set the maximum ISO speed, or select the rate of change.
REFERENCE
Shooting sensitivity increases as the ISO speed goes up. The lower the speed, the lower the sensitivity.
IMPORTANT
- The following section explains the setting procedures when the camera’s shooting mode has been set to [Program AE] (
 ).
). - To set the [ISO Speed], it is necessary to set the [Shooting Mode] to one of the following modes.
- [Custom] ( ), [Manual] (
 ), [Aperture Priority AE] (
 ), [Shutter Speed Priority AE] (
 ), [Program AE] (), [Manual Movie] (
 ).
).
), [Manual] (), [Aperture Priority AE] (), [Shutter Speed Priority AE] (), [Program AE] (), [Manual Movie] ().1. Press the power button to turn the camera on.
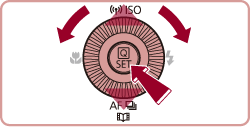
2. Press the [  ] button.
] button.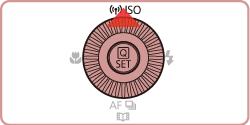
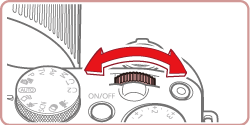
3. Turn the [  ] dial to choose the ISO speed.
] dial to choose the ISO speed.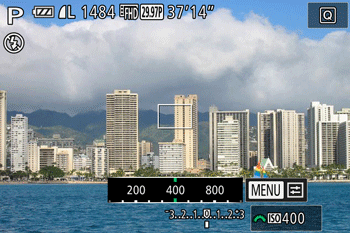
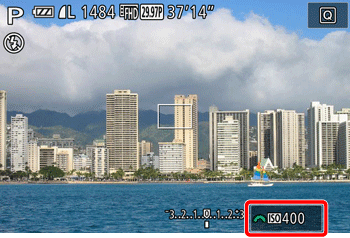
4. The option you configured is now displayed. (The [ISO Speed] has been set to 400 in the example image below.)
NOTE
- Select the appropriate [ISO Speed] for the shooting environment.
| Overview of ISO Speed Settings | |
|---|---|
| AUTO | Automatically adjusts the ISO speed to suit the shooting mode and conditions. |
| 125, 160, 200 | For shooting outdoors in fair weather. |
| 250, 320, 400, 500, 640, 800 | For shooting in cloudy conditions, or at twilight. |
| 1000, 1250, 1600, 2000, 2500, 3200, 4000, 5000, 6400 | For shooting night scenes, or in dark rooms. |
| 8000, 10000, 12800 | |
NOTE
- To view the automatically determined ISO speed when you have set the ISO speed to [AUTO], press the shutter button halfway.
- Although choosing a lower ISO speed may reduce image graininess, there may be a greater risk of subject and camera shake in some shooting conditions.
- Choosing a higher ISO speed will increase shutter speed, which may reduce subject and camera shake and increase the flash range. However, shots may look grainy.
You can also set the ISO speed by accessing MENU > [  5] tab > [ISO Speed] > [ISO Speed].
5] tab > [ISO Speed] > [ISO Speed].When the camera is set to [AUTO], maximum ISO speed can be specified in a range of [400] – [12800], and sensitivity can be specified in a range of three levels.
IMPORTANT
- The following section explains the setting procedures when the camera’s shooting mode has been set to [Program AE] ().
- To set [ISO Auto], it is necessary to set the [Shooting Mode] to one of the following modes.
- [Custom] (), [Manual] (), [Aperture Priority AE] (), [Shutter Speed Priority AE] ()*, [Program AE] (), [Manual Movie] ()*.
), [Manual] (), [Aperture Priority AE] (), [Shutter Speed Priority AE] ()*, [Program AE] (), [Manual Movie] ()*.- Follow the steps below to set the maximum ISO speed with [ISO AUTO] selected.
1. Press the [MENU] button.
2. Move the zoom lever to choose the [ ] tab.
] tab.Press the [ ], [  ] buttons to choose [ 5 ].
], [ ] buttons to choose [ 5 ].Press the [ ], [ ] buttons or turn the [  ] dial to choose the [ISO Auto Settings].
], [ ] buttons or turn the [ ] dial to choose the [ISO Auto Settings].Press the [  ] button.
] button.
3. Press the [ ], [ ] buttons to choose the [ISO Auto].
], [ ] buttons to choose the [ISO Auto].Press the [  ] button.
] button.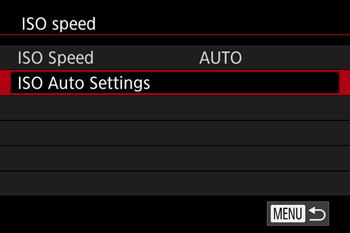
4. Press the [ ], [ ] buttons to choose [Max ISO Speed], and then press the [ ] button.
], [ ] buttons to choose [Max ISO Speed], and then press the [ ] button.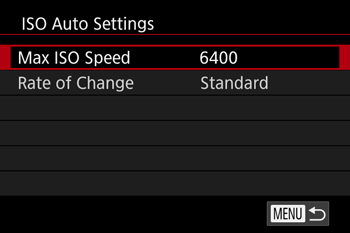
5. Press the [ ], [ ] buttons to choose [Max ISO Speed] and then press the [ ] button.
], [ ] buttons to choose [Max ISO Speed] and then press the [ ] button.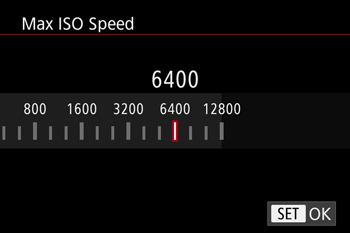
NOTE
[ISO auto] can be specified in a range of [400] – [12800].
- In [ISO AUTO], choose [Rate of Change].
6. Press the [ ], [ ] buttons to choose [Rate of Change] and then press the [ ] button.
], [ ] buttons to choose [Rate of Change] and then press the [ ] button.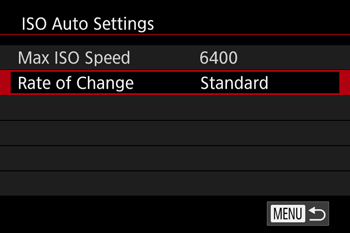
7. Press the [ ], [ ] buttons to choose the desired setting and then press the [ ] button.
], [ ] buttons to choose the desired setting and then press the [ ] button.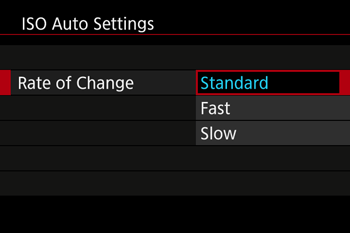
NOTE
- You can also access the [ISO Auto Settings] screen by pressing the [ ] button when choosing the ISO speed via the [ ] button.