How to Configure a Shared Folder (Windows 2000/XP/Server 2003/Vista) (MF4680)
Solution
NOTE
a. It is recommended that the file server be configured by the network administrator.
b. The number of users or clients that can access a server running Windows 2000/Server/XP/Server 2003/Vista is limited. After this number of users or clients is reached, it is not possible to send to a server running Windows 2000/XP/Server 2003/Vista.
c. In the following procedures, items displayed on the screen for Windows XP are used; items might differ depending on your operating system.
1. Log on to Windows as Administrator.
2. Confirm the file sharing settings.
NOTE
For Windows Vista, click [Continue] to proceed if the [User Account Control] dialog box appears.
- For Windows Vista:
Click [Start] on the Windows task bar, right-click [Network], [Properties], [Manage network connections], right-click [Local Area Connection], then [Properties]
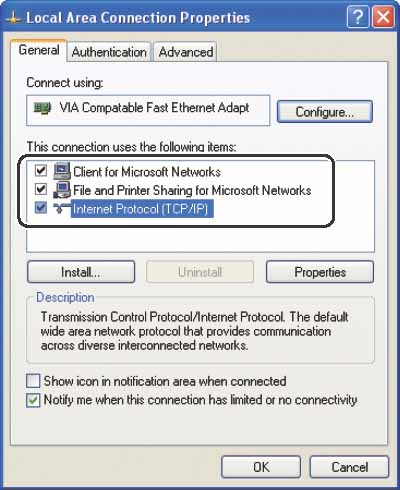
Confirm that [Client for Microsoft Networks], [File and Printer Sharing for Microsoft Networks], and [Internet Protocol Version 4 (TCP/IPv4)] are all selected. If any of these functions is not selected, select it now.
- For Windows 2000:
Right-click the [My Network Places] icon on the desktop, then click [Properties] to open the [Network and Dialup Connections] window.
Confirm that [Client for Microsoft Networks], [File and Printer Sharing for Microsoft Networks], and [Internet Protocol (TCP/IP)] are all selected. If any of these functions is not selected, select it now.
Click [start] on the Windows taskbar, right-click [My Network Places], then click [Properties] to open the [Network Connections] window.
Confirm that [Client for Microsoft Networks], [File and Printer Sharing for Microsoft Networks], and [Internet Protocol (TCP/IP)] are all selected. If any of these functions is not selected, select it now.
- For Windows Server 2003:
Click [Start] on the Windows taskbar, [Control Panel], [Network Connections], right-click the [Local Area Connection] icon, then click [Properties] to open the [Local Area Connection Properties] dialog box.
Confirm that [Client for Microsoft Networks], [File and Printer Sharing for Microsoft Networks], and [Internet Protocol (TCP/IP)] are all selected. If any of these functions is not selected, select it now.
3. Specify the NetBIOS settings.
- For Windows Vista:
Double-click [Internet Protocol Version 4 (TCP/IPv4)] to open the [Internet Protocol Version 4 (TCP/IPv4) Properties] dialog box, then in the [General] sheet, click [Advanced].
In the [Advanced TCP/IP Settings] dialog box, click the [WINS] tab, then in the [WINS] sheet, click [Enable NetBIOS over TCP/IP].
Click [OK] until all the dialog boxes are closed.
Restart the computer if prompted.
- For Windows 2000/XP/Server 2003:
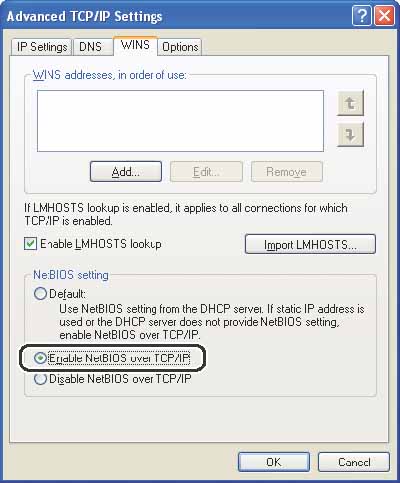
Double-click [Internet Protocol (TCP/IP)] to open the [Internet Protocol (TCP/IP) Properties] dialog box, then in the [General] sheet, click [Advanced].
In the [Advanced TCP/IP Settings] dialog box, click the [WINS] tab, then in the [WINS] sheet, click [Enable NetBIOS over TCP/IP].
Click [OK] until all the dialog boxes are closed.
Restart the computer if prompted.
4. Confirm the computer name.
NOTE
For Windows Vista, click [Continue] to proceed if the [User Account Control] dialog box appears.
- For Windows Vista:
Click [Start] on the Windows taskbar, right-click [Computer], [Properties], then [Advanced system settings].
Click the [Computer Name] tab to display the [Computer Name] sheet.
Click [Change], then [More] in the [Computer Name Changes] dialog box.
In the [DNS Suffix and NetBIOS Computer Name] dialog box, confirm [NetBIOS computer name].
Click [Cancel] until all the dialog boxes are closed.
- For Windows 2000:
Right-click the [My Computer] icon on the desktop, then click [Properties].
Click the [Network Identification] tab to display the [Network Identification] sheet.
Click [Properties], then [More] in the [Identification Changes] dialog box.
In the [DNS Suffix and NetBIOS Computer Name] dialog box, confirm [NetBIOS computer name].
Click [Cancel] until all the dialog boxes are closed.
- For Windows XP/Server 2003:
Click [start] or [Start] on the Windows taskbar, right-click [My Computer], then click [Properties].
Click the [Computer Name] tab to display the [Computer Name] sheet.
Click [Change], then [More] in the [Computer Name Changes] dialogbox.
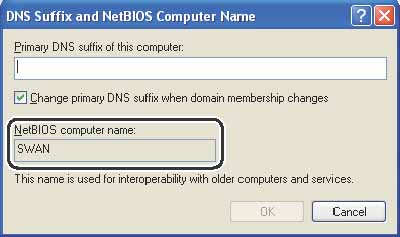
In the [DNS Suffix and NetBIOS Computer Name] dialog box, confirm [NetBIOS computer name].
Click [Cancel] until all the dialog boxes are closed.
5. Open the [Computer Management] window.
For Windows XP Home Edition, skip step 7.
NOTE
For Windows Vista, click [Continue] to proceed if the [User Account Control] dialog box appears.
- For Windows Vista:
Click [Start] on the Windows taskbar, right-click [Computer], then click [Manage] to open the [Computer Management] window.
- For Windows 2000:
Right-click the [My Computer] icon on the desktop, then click [Manage] to open the [Computer Management] window.
- For Windows XP/Server 2003:
Click [start] or [Start] on the Windows taskbar, right-click [My Computer], then click [Manage] to open the [Computer Management] window.
6. Set up the users and passwords for access to the shared folder.
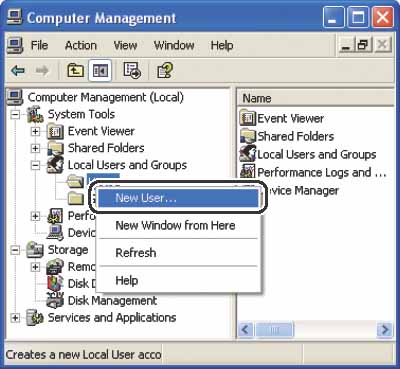
Under [System Tools], double-click [Local Users and Groups], right-click the [Users] folder, then click [New User].
In the [New User] dialog box, enter the user name in [User name], enter the password in [Password], then re-enter the password in [Confirm password].
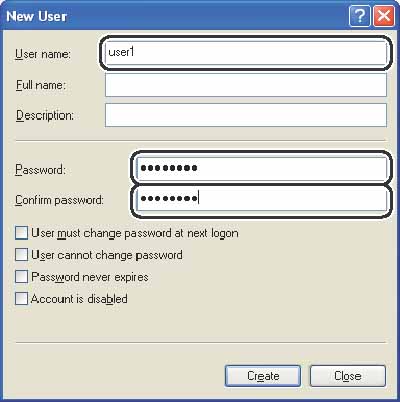
Enter a user name not longer than 20 alphanumeric characters, and a password not longer than 14 alphanumeric characters. If [User must change password at next logon] is selected, any new users added must change their passwords in order to send data from the machine. (You cannot change the password from the operation panel.)
Confirm the settings, then click [Create].
Close the [Computer Management] window.
7. Configure the shared folder.
NOTE
For Windows Vista, click [Continue] to proceed if the [User Account Control] dialog box appears.
- For Windows Vista:
Right-click the folder you want to share using Explorer, then click [Properties].
On the [Sharing] sheet, click [Advanced Sharing].
On the [Advanced Sharing] dialog box, select [Share this folder], then enter the share name in [Share name].
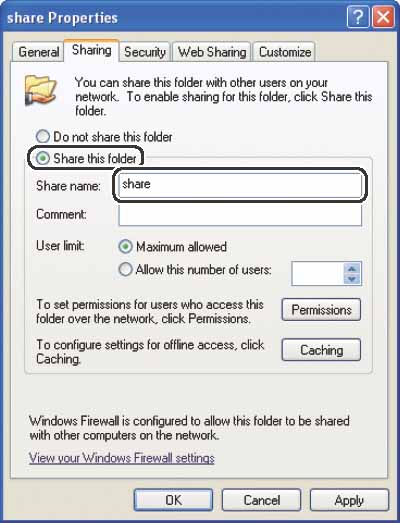
- For Windows 2000/XP/Server 2003:
Right-click the folder you want to share using Explorer, then click [Properties].
On the [Sharing] sheet, click [Share this folder], then enter the share name in [Share name].
8. Set security.
- To create a shared folder on a FAT or FAT32 format disk (If the [Security] tab is not displayed):
Click [Permissions], then select or add the users or groups to whom you want to give access to the shared folder.

Under [Permissions], select both [Change] and [Read], then click [OK].
- To create a shared folder on an NTFS format disk:
Click [Permissions], then select or add the users or groups to whom you want to give access to the shared folder.

Under [Permissions], select both [Change] and [Read], then click [OK].
For Windows Vista, click [OK] to close the [Advanced Sharing] dialog box.
Click the [Security] tab.
In the [Security] sheet, select or add the users or groups to whom you want give access to the shared folder.
Under [Permissions], select both [Write] and [Read & Execute], or a higher access authority. For data in the folder, check both [Write] and [Read], or a higher access authority.
Click [OK], then close the properties dialog box of the shared folder.
NOTE
a. To display the [Security] tab in Windows XP, follow the procedures below. For details about the settings, see the documentation provided with Windows XP.
b. Windows XP Professional: Open Folder Options, then deselect [Use simple file sharing]. However, you can share folders and files with [Use simple file sharing] selected. Select or deselect [Use simple file sharing] to suit your environment.
c. Windows XP Home Edition: Start Windows in safe mode, then select [Safe Mode with Networking] in the Windows Advanced Options Menu. After logging on to Windows, you can find a [Security] tab by opening the properties dialog box of the shared folder.
9. Set a destination address using the operation panel.
- Sample destination setting:
Server side settings:
[NetBIOS computer name]: swan
[Share name]: share
Create a folder called Images within share, and then specify Images as the destination for sending.
The machine' s destination settings:
The server protocol: [SMB]
[NAME]: The destination' s name
[HOST NAME]: \\swan\share
[FILE PATH]: \Images
[LOGIN NAME]: User name entered in step 6.
[PASSWORD]: Password for the above user.
NOTE
a. A maximum of 120 alphanumeric characters can be entered for [HOST NAME] on the operation panel. Also, a maximum of 120 alphanumeric characters can be entered for [FILE PATH]. Enter each of these items on the server using no more than their allowable number of characters.
b. If you change the language of the LCD display, [HOST NAME] and [FILE PATH] may not be displayed correctly, or you may not be able to browse the directories.
c. If the language of the LCD display differs from the computer on your network, [HOST NAME] and [FILE PATH] may not be displayed correctly, or you may not be able to browse the directories.
d. You can send data using the following formats. A DNS server is required for the latter case:
\\192.168.2.100\share
\\host_name.organization.company.com\share
e. For Windows XP Home Edition, [LOGIN NAME] and [PASSWORD] are not required.